Part II of building a Modern Data Platform in Azure using Terraform
Through a series of posts, we will go from nothing more than a machine that meets the minimum requirements for the azure-terraform-bootstrap to a fully functioning Enterprise-class Modern Data Platform. Our last blog post created the basic constructs necessary to use Azure as a backend for Terraform. In this post, we walk through the architecture and code to create a headless Linux VM to support future workloads as either a workstation or a build agent.
Why are we doing this?
As we look to stand up a Modern Data Platform, there are going to be a number of software development efforts. Having a standard development and deployment platform across a team is critical in producing stable releases and deployments. Instead of relying on a list of required software for you, the reader, to install and have on your own machine, I’ve decided to create a VM that we can deploy and use; this will provide anyone following along an environment that is guaranteed to be compatible with all of the code we walkthrough. This development environment could have been delivered in multiple ways, including a VM image or a docker container, but in both of those solutions, it would require the reader to have some means of deploying those solutions, so I chose to go with the most basic building blocks that require the least amount of software and resources on the reader’s end. It will also serve as the basis for any other VMs we need in our environment as we advance to support the Modern Data Platform. The terraform-vm-headless-linux repository works in conjunction with the terraform-azure-bootstrap.
What are the benefits of this headless Linux VM?
- Which OS is superior, Linux or Windows – Note going down this rabbit hole suffice to say I appreciate both, but to put it simply, this level of reasoning was not taken into account in making the decision to provision a Linux VM
- The Linux distribution chosen is Debian which has no OS license or OS support cost associated with it, making it an inexpensive choice.
- The Debian distribution has a large number of packages available to it and is well supported with Azure. It also is a relatively complete but small build compared to other distributions.
- The headless Linux installation was chosen to cut down on compute resources necessary to support the machine. A SSH session is much less compute and memory intensive compared to a RDP or VNC session.
- Only allowing SSH cuts down of the surface area available for attack by nefarious individuals.
- Tools can be installed at deployment time in a relatively short time frame without reboot complications allowing us to install all the necessary tools in a single script feed to the cloud-init process.
- All tools can be deployed via a command line by default without having to install an additional package manager.
- The terraform code wraps the VM in an NSG that is by default limited to the incoming IP address of the machine that ran the Terraform, again decreasing the attack surface.
- The terraform code encrypts the disk using user-defined keys stored in a key vault. The disk data itself is encrypted while at rest in addition to the standard encryption provided by the Azure Storage account that holds the VM disk. This provides additional security in the event of someone getting ahold of our disk image it would be encrypted and the data on it unusable.
- The terraform code enables boot diagnostics using the Microsoft recommended managed storage account.
- Boot diagnostics is a debugging feature for Azure virtual machines (VM) that allows diagnosis of VM boot failures. Boot diagnostics enables a user to observe the state of their VM as it is booting up by collecting serial log information and screenshots.
What will this Terraform job create?
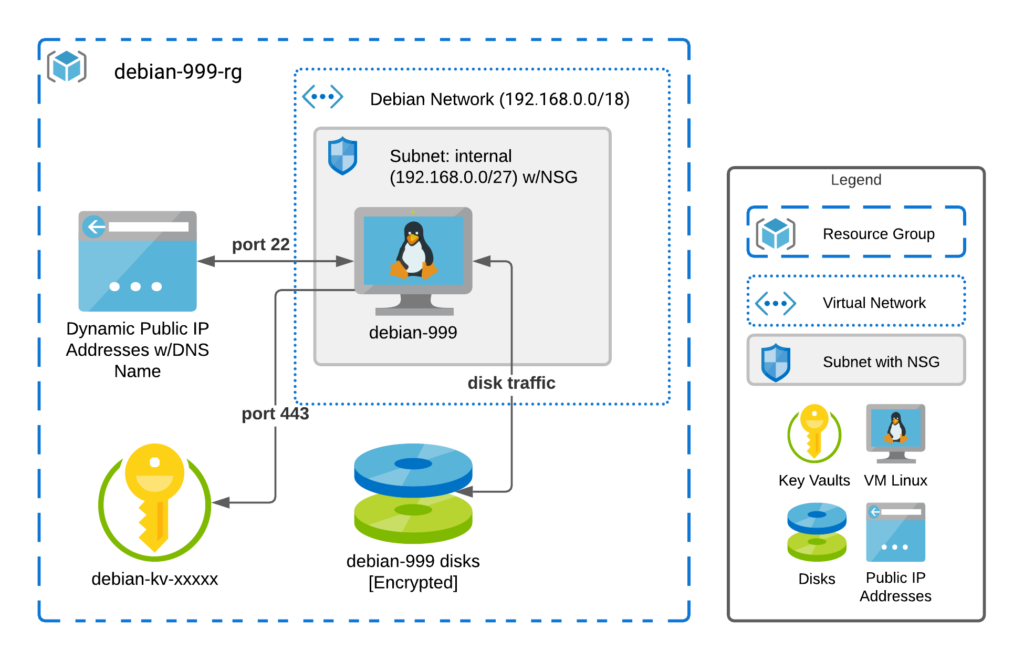
- A Resource Group
- A Linux VM w/disk and nic
- A Vnet w/Subnet
- A Public IP connected to the Linux VM
- An NSG blocking all traffic except 22 from your IP

What exactly with more detail will this Terraform job create?
So I’ll be as detailed as possible without repeating the code itself. If you require a certain level of detail, you need to read the code to get the answers. As a security precaution, I would definitely suggest you read and understand any terraform before deploying it to your environment. This project will deploy a resource group named Debian followed by the machine number parameter with the suffix of “rg”. The code deploys an Azure Key Vault, a VNET, an NSG, a Public IP, and a VM into the resource group. The Public IP will have a randomly generated name associated with the default DNS. This will result in the public IP having a DNS name like random-name.eastus2.cloudapp.azure.com. The purpose of the DNS name is to make it easy to find the IP without having to know the actual IP as this is a Dynamic IP, and it will change when the machine is paused and turned back on. The VM is a fully functional headless VM running Debian 11 with a number of software packages being deployed to it required to make it a useful deployment and workstation for further terraform projects. The full list of software packages is below. The Managed Disk associated with the VM is encrypted using keys in the key vault to protect the VM image itself from being opened if it is somehow cloned and moved to a different security context. The Public IP is, of course, associated with the VM. The VNET is given a network CIDR range of 192.168.0.0/18, and there is one subnet in this VNET given the CIDR range 192.168.0.0/27. The NSG is associated with the subnet the VM is in. The NSG is relatively simple and blocks all inbound traffic except for port 22, SSH coming from the restricted IP provided at execution time, which is the IP of the machine running the Terraform code. The NSG affects/protects the traffic coming from the Public IP to the VM. Everything is tagged with the “env” and “project” tags with the values provided in the tfvars files, whatever was provided at runtime. The intent of all of this is to provide a secure workstation/build server to use as the basis for future terraform projects and provide everyone following along with this series a standardized machine to work from.
VM installed software
- Terminal Manager/Multiplexer – tmux
- Vim Python 3 support – vim-vox
- Vim Code Completion – You Complete Me
- Infrastructure as code tools – Terraform
- Azure Tools – AZ CLI
- Azure Tools – Powershell w/ AZ module
- Python 3.9 Development Tools
- java
So how do we implement this?
Simple, just a few steps
- Make any necessary modifications to the prod.tfvars file you feel is necessary. You most likely want to either add some tags or change the machine number your choice.
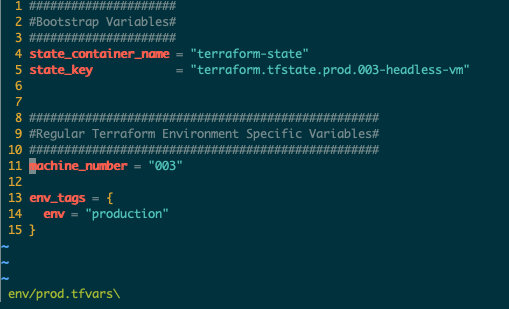
- Next, run the bootstrap from the terraform-azure-bootstrap project passing in the prod.tfvars file for this project.

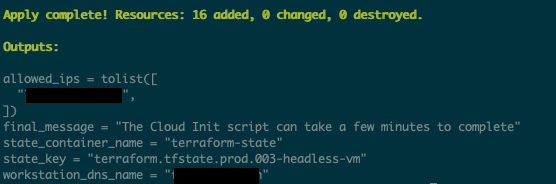
- Finally, run terraform, passing in a password variable of your liking. Do not use the default as the value is in Github for all the world to see. Below you can see the execution of terraform apply using the “auto-approve” option as well as specifying the override password at runtime. With the resulting resource creation summary and associated output variables in the second screenshot below.

Possible improvements:
- Move boot diagnostics to custom storage that is reachable via specific VNET’s trusted Microsoft Services and specific IP address only.
- Make that Storage Account only reachable inside specific VNET’s trusted Microsoft Services and specific IP address only.
- Make the Key Vault only reachable inside specific VNET’s trusted Microsoft Services and specific IP address only.
- Enable more in-depth logging for the VM and the rest of the environment.
Useful Links: