Having an Azure Subscription is a prerequisite to doing pretty much anything in Azure. Azure Subscriptions are top level containers for Billing, Permissions, and Management. The Azure Subscription is contained inside a Microsoft Organization most likely identified by one more more DNS names. This name is normally the Microsoft Entra Tenant (previously known as Azure Active Directory) which provides users accounts, authorization, and authentication. There is a few good pages and articles from on this topic from Microsoft which you will find in the links section below. What we need to do is create a subscription.
Creating a subscription is pretty easy and for your first one you may just want to use the Azure Portal as that is the fastest way to get started. There are a few different types of subscriptions we will be focusing on an Azure Pay as You Go Subscription. We accomplish the set up in 5 steps listed below. Normally we are Terraform first but in this instance since you may be getting started we felt a manual walk through of the portal was best.
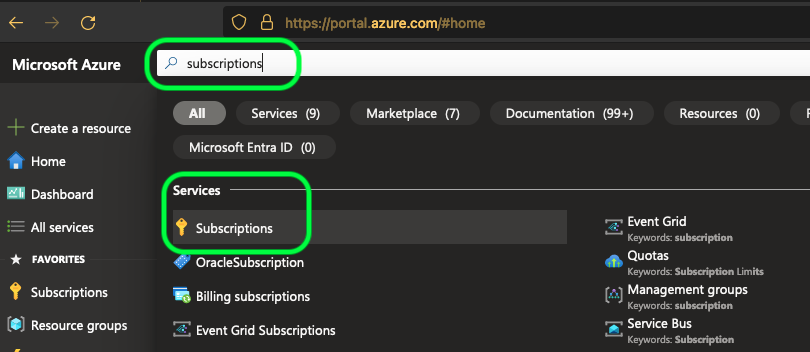
Step One: Navigate to the azure.portal.com and once you are logged in click on the search bar at the top of the screen and type the word “subscriptions”. This will cause the Subscriptions option to appear in the list of Services. Click on the Subscriptions option.
Step Two: This will bring you to the Subscription Blade. Once that screen has opened up press the “Add” button to create a new subscription, below the Subscriptions heading.

Step Three:
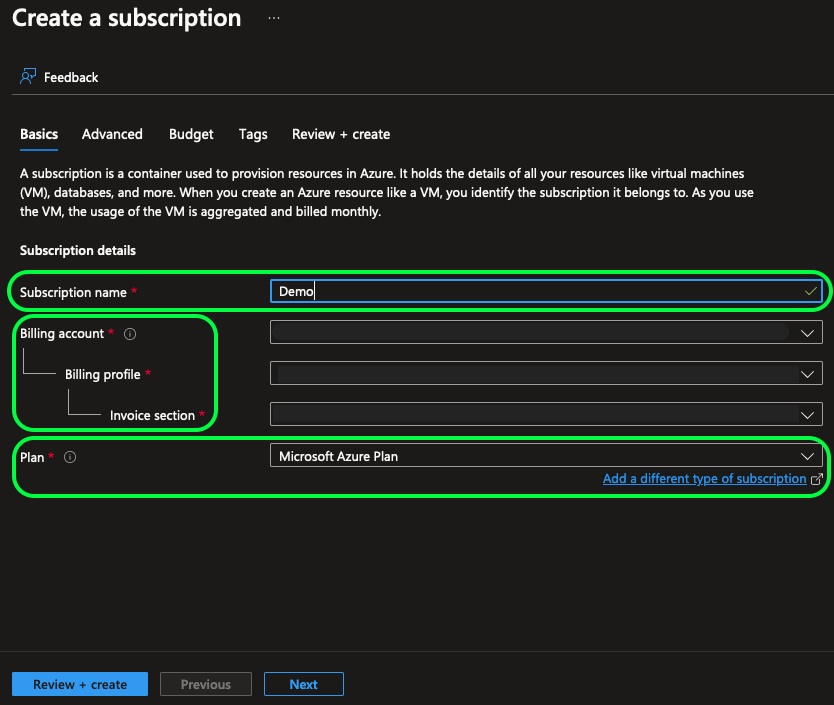
Step Four: In the Basic window there are four pieces of information you need to enter. The Subscription Name, choose something useful we are going with “Demo” for this walk through. The next three and are all pre-populated, Billing Account, Billing Profile, and Invoice Selection. If you are using a straight forward Pay as You Go or Free Subscription Offer type there is most likely only one choice in the drop down. These two types of offers are covered under a Microsoft Customer Agreement. There is a strong chance that the all three share the same name which is the name of the organization that provided the Credit Card or the individual who supplied the Credit Card information. Go with the default for all three, if you have multiple options you maybe logged in as part of an Enterprise Account or a more complex Microsoft Customer Agreement if so please work with your Billing Account Manager to figure out what the correct selection is. The last item the Plan is also a drop down and should be populated with Microsoft Azure Plan which is what we want and indicates another Pay as you Go Subscription. Click Review + Create.
Note: Starting Microsoft Customer Agreements are limited to 5 Subscriptions and increased based on the organizations history with Microsoft. If you have issues creating more than 5 subscriptions this maybe the reason.
Note: The items under the Advanced, Budget, and Tags windows are outside the scope of this basic subscription creation. We also feel that Budget, Tags, and the options under Advanced dealing with Management groups is better handled separately.
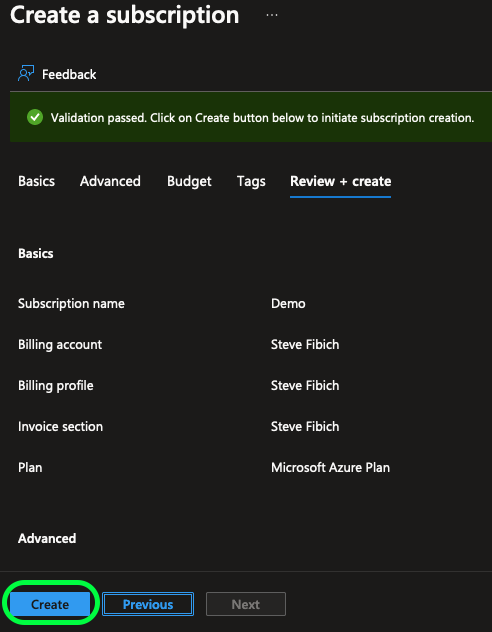
Step Five: Click the Create button after reviewing the information provided. Clicking the Create button will bring you back to the Subscriptions blade in step 2. Please notice the new subscriptions Subscription ID as you will need this value in future walk throughs. Please note it will take a few seconds and the subscription will be created and ready for use. You may also find that you have to manually refresh the Subscriptions blade or even toggle the Subscription filter from Basic to Advanced. (There is a link below just in case.)
Thats it hopefully this didn’t take more than 10 minutes and you are ready to progress with what ever walk through article lead you here!
Links